5 Tips for Doing Yoga on the Beach

Do you love going to the beach in the summer? I do. And I love doing yoga on the beach. Some resort towns offer yoga classes on the beach and that can be great, but it is often fun to just do your own practice. I love to go for a long walk, stretch out and do a practice and then go for a swim.

If the idea of practicing yoga on the beach appeals to you, I thought I’d share some of my personal do's and don'ts before you head out:

1. Do your practice on the beach before 10:00 am or after 4:00 pm when the sun is not as strong. I especially prefer the earlier time because I am a morning person. But the real reason I prefer these times is that I do not like to practice yoga on the beach while wearing sunscreen. Sand sticks to the sunscreen and makes me uncomfortable.  Of course you can wear athletic clothing that has an SPF factor if you are concerned about sun exposure, but I like to get a little of direct sun in the off hours for the production of Vitamin D. Also, unless you like attracting a lot of attention, the off hours give you a little more space.

2. Don't take your sticky mat to the beach!  Sticky mats were made to work on hard floors, not sand, dirt or even grass. Sticky mats will attract and hold onto sand.  When teaching yoga at the studio, I have often stepped on a pile of grit on the floor from someone's sandy yoga mat. It is hard to get the sand out of the mat. Even after washing sometimes sand remains. Let your hands and feet feel the earth. It is grounding and good for the soul.

3. Use a towel when necessary. I use a towel mostly to keep my hands clean.  When I do Downward facing Dog, I place my hands on a towel and keep my feet on the sand.  I definitely use my towel for seated and lying down poses.  When the towel gets scrumbled up and sandy, I just shake it out and reposition it on a fresh patch of sand.  Although I have to say that I love doing a split directly on the soft sand.  Your heels will dig a little trench and the warm soft sand will support your whole thigh in a way that allows you to relax into the stretch.  Usually after a split, I might rinse off in the water, do a Seated Forward Bend on my towel and then do Savasana.

4. Change your practice to suit the conditions.  Instead of coming into your standing poses from Down Dog, start them from Tadasana.  This way your hands don't get sandy.  You can do Sun Salutes directly on the sand. That will inspire you to not lower onto your belly, but to hold the Low Push Up and transition into Upward Facing Dog instead of going to your belly for Cobra. If you do need to lower to your belly, either do it on a towel, or skip the sun salutes.

5. Find the most level part of the beach to practice on. Sometimes this is hard as a lot of beaches slope to the water. You can adapt most of your poses to a slight incline, but headstand and a lot of the hand balancing on anything but a truly flat surface is tricky.

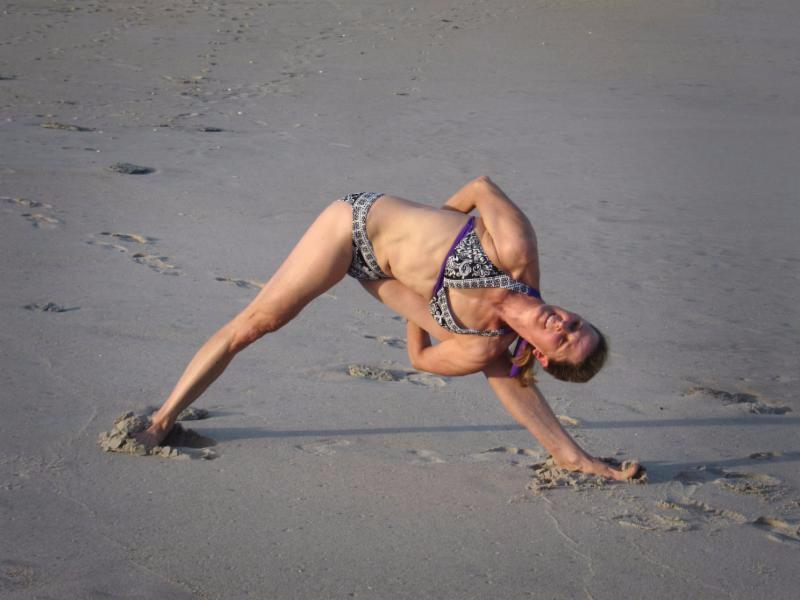
Revolved Triangle on the Beach
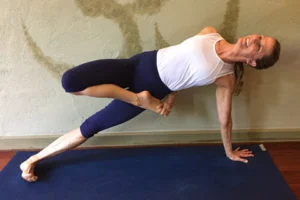
Bound Triangle

Bound Triangle

While I specifically mention the beach, you can apply these principles to any outdoor yoga session.  You don't need a yoga mat to do yoga, sometimes it is helpful and sometimes it just gets in the way.  I hope you get out there and enjoy doing yoga outside. Working on different surfaces causes your muscles to work in a different way. It’s a refreshing addition to your practice.

Have fun out there and feel free to post a picture of yourself doing yoga on the beach, or any other place outside.
I’ll see you in class! Karin

What is yoga?

hanuman.jpg

Is it exercise? Religion? Lifestyle?

I originally got into yoga for the physical aspects. I was told that it would help me relax, and it did. I liked the way I felt after a yoga practice—calmer, certainly, but also more flexible and stronger, too.

In the yoga studio where I first started practicing, there were these printed signs around the ceiling: Ahimsa, Asteya, Satya, Aparigraha, Brahmacarya, Saucha, Santosha, Tapas, Svadhyaya, Ishvara Parnidhana ... I remember vaguely wondering what they meant but ultimately I did not care enough to inquire until several years later.

Eventually I learned that these were the first two steps on the path to yoga: the Yamas, or how you act in the world and how you treat others, and the Niyamas, or observances and practices that you do for yourself. I also learned that while the yoga poses were a doorway inside of yourself, these Yamas and Niyamas were the real tools that helped you be calmer and more content in your life.

It seems that I followed the natural progression of most people in yoga of starting with the physical when you are young and moving toward the more philosophical as you age. (I was in my early 20s when I started.) As a general rule, as people get older, they tend to turn more inward, becoming more philosophical.

Over the years, I have become more interested in the other steps on the path to yoga other than just asana. There are eight of these steps. The first two are the "Yamas" and the "Niyamas." The third is "Asana," which is what we practice as Hatha Yoga, and then "Pranayama," or breath work.

The next four steps are about turning inward. This was probably the real reason I wanted to get into yoga, but I just didn't know it. It took many years to get here. Like most people, I resisted these steps.  I just wanted to do the poses.  These four steps start with "Pratyahara," or withdrawal of the senses. This is the ability to not be swayed so much by our senses; to not be affected as much by attachment and aversion, which is often the cause of suffering. The next step is "Dharana," or concentration. If you can control your senses, then you can concentrate. It is hard to concentrate when you are being pulled by different likes and dislikes. After you develop the ability to concentrate, then comes meditation or "Dhyana."

Meditation isn't something you do; it is a state that can be entered into after controlling the senses and developing your ability to concentrate. When you can keep your concentration and stay in the present moment, without worrying about the past or being anxious about the future, you might be able to enter into a state of "Samadhi." This is the last step on the ladder of yoga. It is often called Bliss, which can be misleading. It is more like a calm and connected state. While Joy is part of Samadhi, it is not the joy of winning the lottery. It is more of an inward contentment and sense of connection with the world around you. Most yoga practitioners experience brief states of Samadhi. Maybe you have, too, and just didn't know what it was.

If you are ready to learn more about yoga, it might be time for you to sign up for an immersion experience. I recommend that you start with the Foundations Module of my Yoga Teacher Training Program. You don't need to want to become a teacher to take this module. This first step is simply to learn more about yoga. You will learn how to develop your own home practice. I will introduce you to Pranayama, or breathing exercises. We will begin to develop habits that lead toward meditation. We will also contemplate the Yamas and the Niyamas, the practices that lead to more happiness and contentment in your life.

Contact me to find our more about teacher training.

Pose of the Month: Vrischikasana (Scorpion Posture)

You can see how this posture got its name; it looks just like a scorpion. There are two versions of Vrischikasana. The first one is done from Forearm Balance, or Pinca Mayurasana. This is an easier version of Scorpion to balance in, but it also requires more stretch in the shoulders. The second version is done from Handstand. It is useful to play with both of them.

Prerequisites: You need strength, shoulder flexibility and a deep back bend to do Scorpion.

  • Strength: There are two separate areas of strength necessary for Vrischikasana: One is core and the other is shoulders. You can build strength in both of these areas at the same time by practicing your ability to hold the various plank positions. There are four versions of Plank Pose on your hands: forward, to the right side, to the left side and Reverse Plank. In the beginning, try holding each one for 20 seconds. Build up to being able to hold each one for a minute. You can also try holding Plank Pose on your forearms.

  • Shoulder flexibility: To do Scorpion and keep your shoulders and your rotator cuff safe, you need to work on stretching your arms overhead. You should be able to stretch your arms overhead and have them be in a straight line with your body without arching your back. If you cannot do this, it is important to work on stretching your shoulders by doing poses like Warrior III with your hands on a ledge, or in Down Dog.

  • Back bends: As you can see in my Scorpion, I cannot get my feet to my head, yet. So, it is not necessary to be able to do so to work on the pose, but you should be pretty strong in your Wheel. Try practicing Wheel against the wall. Start by placing your wrist creases at the corner of the wall and the floor. When you lift up into Wheel, move your chest in the direction of the wall. If your chest can touch the wall, you can begin to work on coming down on your forearms in Wheel. Press your elbows against the wall and begin to move your chest toward the wall. Camel is another great pose that will help with your Scorpion. More than Wheel, Camel will also work to strengthen your abs. From Camel, you can progress to what is often called Pigeon Droppings. This is where you drop back from Camel to your hands.

  • Arm balances: No matter which of the two Scorpion versions you try, you should be pretty comfortable in Forearm Balance and in Handstand. This doesn’t mean that you have to be able to balance in these poses in the middle of the room, but you should be relatively strong in each one of these at the wall.

Remember not to rush the pose. Take your time and enjoy the process. Set small, achievable goals for yourself and celebrate each time you reach one. You don’t want to get stung by forcing yourself into Scorpion!

Pose of the Month: Kasyapasana (Half Bound Lotus Side Plank)

Kasyapasana

The pose dedicated to the sage Kasyapa.

Any of the postures dedicated to a sage are among the most difficult poses to work on. They are often arm balances like Kasyapasana, and they take persistence. They are also among the most gratifying to achieve because of the hard work and dedication you have to put in to get them.

You already know yoga is transformational: The practice strengthens your body, focuses your mind, and tempers your nervous system. But the most powerful shift occurs when you realize you can do something you didn’t think was possible. And when you exceed your own expectations, you feel a sense of empowerment that flows into every facet of your life.

For many students this occurs when they finally achieve an arm balance. Watching someone perform a challenging pose can be inspiring, and they may make it look deceptively easy. The process of breaking down a posture and working on its individual parts can be a fun challenge if you allow it to be.

Kasyapasana is a combination of Side Plank and Half Lotus with a bind. Most arm balances require core and shoulder strength. But this arm balance also requires hip and shoulder flexibility. The other unusual thing about this particular arm balance is that in most poses that include Half Lotus, the hip is flexed. This makes it easier to bind the foot. Kasyapasana makes it more challenging by extending the hip.

To work on this arm balance, we will work on the following poses:

For the core strength: Side Plank and Side Plank with Tree Variation

About Me

karin-300x300.jpg

I started doing yoga in 1980. Someone recommended a yoga class to help me relax. So, I signed up.

I don't know if I had a choice back then, but I landed in an Iyengar class with a fabulous teacher by the name of Connie Fernandez. (She moved to New Mexico in the mid-1980s, and I lost touch with her. If anyone knows of her whereabouts, I would love to let her know how much she inspired me!) She used to read us stories while we were in headstand to help pass the time. My favorite story was "The Face of Jesus on a Tortilla." That was probably a 10-minute headstand!

My only interest in yoga back then was purely physical. It did help me to relax, but it also helped me stay in shape between seasons of whatever sport I was into: biking, snow boarding, running, hiking, surfing and windsurfing.

After Connie moved, I floated around to find another yoga teacher. Soon, I discovered that Joan White, one of the top Iyengar teachers in the US, lived very close to me. I started taking classes at her house. It was great! If there were other styles of yoga making their presence known, I was unaware of them. I loved the precision and alignment of Iyengar Yoga.

When I turned 40, I hit my midlife crisis. I quit my job teaching Woodshop at Germantown Friends School after 18 wonderful years there. I moved out of the house that I was literally born in and where I lived my entire life, and my husband and I adopted a sweet little boy from Korea! Suddenly, I was a stay-at-home mom in Bucks County, and I didn't quite know what to do with myself. Fortunately, I knew enough yoga to have a home practice, but I needed a teacher and some adult contact for myself. I found Vidyaa Yoga Studio, a local studio with childcare! Who cared that it was Power Yoga (vinyasa style with heat). I was happy to have found a place to practice and a community of friends. At Vidyaa, I also uncovered my desire to become a yoga teacher. That was back in 1999. In 2000, I became certified to teach Power Yoga under Cassandra Kish and have been teaching ever since.

Surprisingly, after all of my Iyengar classes, I loved Power Yoga. I loved the challenge and the flow, but I noticed that some areas of my flexibility weren't improving. I knew quite a bit about alignment from my previous practice, but that was from the point of view of a student. As a teacher, I needed to know more. So, I took an Iyengar teacher training course with Theresa Rowland from Studio Yoga in Madison, NJ. That helped answer my questions of "why?" and "how?" As my knowledge grew, so did my awareness of other styles of yoga. I studied Ashtanga yoga with Shari Simon of Sun Dog (even before there was a Sun Dog Studio), and when she sponsored David Swenson to come to town, I studied with him.

As we know, the only constant in the universe is change. So, from Vidyaa, I moved with my friends Melinda Drellich and Susan John to Flip Dog. I continued to teach and study and grow. When Anusara yoga came into the area, I studied that, too. I did teacher trainings and Immersions with Sue Elkind and Naime Jezzeny of Dig, and with Michelle Synnestdvedt of Prasad, not to mention studying with John Friend. In time, I became an Anusara-Inspired teacher. I loved the heart-opening qualities of the practice and the interweaving of the spiritual concepts into the physical practice.

Another change occurred when Flip Dog closed and I moved to the Solebury Club and to Yogaphoria. And here I am, 30 years later, still studying, practicing and teaching. Along the way I have studied a lot of different styles with a lot of different teachers, some local and some nationally known. I have learned a lot from each one and I am indebted to each and every one of them. I have learned that there are a lot of ways to do poses; each way has its benefits and trade-offs. That gives me a lot of tools in my tool kit.

Another benefit of 30 years of practice, besides a lengthy bio, is that I have worked through my share of injuries and good and bad times with my own practice. I've torn my hamstring three times, and I broke my foot and was on crutches for 12 weeks (but still practiced and taught, which is just one of the reasons why I ask my student teachers to learn to teach a class without practicing along with your students, because one day you might be forced to, and if you don't already know how then you're sunk). I also have some personal experience with scoliosis and arthritis and menopause ;-). There were times when I felt that I was a fraud as a teacher because of my personal setbacks and my own physical limitations and felt that I should quit. Over the course of my practice I have both loved and hated different poses at different times. I remember when my hamstrings were tight and I thought I'd never be able to touch the floor. Then I tore my hamstring and gave up caring and humbly started over. I can't tell you when I finally was able to touch the floor, but I know that I can now do it anytime and it so doesn't matter. One of my favorite Ramanand Patel quotes is "I've been to the floor and back, so I can tell you, God is not in the floor!" I still can't do a handstand in the middle of the room, but I am getting closer because I keep working on it. Some day I will be able to do it (or I won't and it, too, won't matter). Over the years I have also become more and more interested in the philosophical and spiritual aspects of my practice, as anyone who comes to my classes can attest. Still, I would have to say that my strengths as a teacher lie in my ability to read the body and see what is going on physically.

A word in Sanskrit that has a lot of meaning for me is "Abhyasa." The word Abhyasa means a serious practice, continued over a long period of time without interruption. I've kept at this practice for 30 years. If there is a period of time when I can't or don't practice, I feel it, and when I do return to my practice, I feel as if I'm coming home. That has sustained me, over time, more than anything else.

Most of what we know about yoga, we owe to B.K.S. Iyengar

Iyengar.jpg

I was very saddened to hear of the passing of Mr. Iyengar on August 20th. B.K.S. Iyengar was one of the founding fathers of modern yoga as we know it in the West.

Iyengar was sickly as a child, and he credited yoga with helping him gain his good health. His method of yoga was to use props to support the body to put it into the best possible alignment so that the postures and their benefits were accessible even to those with physical limitations. So, if you have ever used a block or a strap, or even a yoga mat, you have benefited from the yoga of Mr. Iyengar.

I have a favorite quote from Mr. Iyengar. I couldn't put my hands on it in time for this newsletter, but it went something like this:

Attention to alignment in asana is discipline; discipline leads to perfection and perfection is god.

To me this means we should show up regularly for our practice. We should strive to do the best with what we have and not worry about what someone else has or can do. If we do this with our whole hearts and with undivided attention, then we will shine with an inner light and know inner contentedness and bliss.

Practice Makes Perfect

Practice makes perfect. How many times have you heard that before? But is it true?

I had a guitar teacher who used to say, "Perfect practice makes perfect."

Eka-pada-viparita-dandasana-RG-200x300.jpg

I was learning to play scales on my guitar, and I had trouble with certain finger positions. My instructor asked me to practice picking up speed. I could play certain parts pretty fast. I would go along playing smoothly, and then I would stumble over this particular pattern. He stopped me and said to slow everything down again and keep going over the part I was having trouble with until I could get it perfectly. I could go only as fast as I could play it perfectly. He said that if I kept playing it the way I was practicing it, I would simply reinforce the same mistake over and over, and that is how I would play it. It made sense to me, and my ability to play those particular patterns improved.

The same thing happens in our yoga practice. We want to get our hamstrings to stretch more and we keep trying, but we don't seem to be getting anywhere. When this happens, you have to stop and look at what you are doing.

The first thing you have to ask yourself is are you being consistent? It takes repetition and consistency to change a pattern or habit, to lengthen your hamstrings or to deepen a back bend, let's say.

The other thing you have to look at is how are you practicing? Are you trying to speed ahead to get somewhere but stumbling over certain parts?

Often when we aren't progressing in our practice, it's because we are doing something wrong; we are out of alignment somewhere. That's the perfect time to slow down and really pay attention to what we are doing and how we are doing it.

One of the most common problems in folding forward is rounding in the back rather than hinging at the hips. As long as we round in our backs, our hamstrings will not be getting the stretch they need to lengthen. But, most students either don't know that they are rounding in their backs, or they don't want to back up and sit up straighter because they feel like they are not folding forward. They tend to want to skip over that part.

Every time I felt stuck in my yoga practice, where I felt that I wasn't making progress, the thing that helped the most was slowing down, backing up and starting over. By doing so, I was able to notice where I was stumbling over certain parts. I could smooth them out and practice them more perfectly. This is where progress is made.

It's not simply repeating something over and over. It's how we repeat the thing we are trying to practice.

Whenever you feel stuck in your yoga practice; slow down, back up and really pay attention to what you are doing and how you are doing it.

See if perfect practice makes perfect for you. And then settle in and practice.

Can you see through your yoga pants? 

Please don't be offended by the title for this blog post. I view it as a public service announcement. Do you know if your yoga pants are sheer enough to see through? Have you ever thought about it? Did you ever think about what happens to the fabric of your yoga pants as it stretches when you bend? If you don't know and you care, you might want to read my article below.

How sheer are your yoga pants?

Can you see through your yoga pants?

A while back there was a bit of a scandal regarding yoga pants made by the company lululemon. The scandal involved yoga pants that you could see through. Apparently women were appalled that you could see through their $80 yoga pants when they bent over. I suppose that you would expect that your expensive, specially made yoga pants would cover you. I get that.

As yogis, we spend a fair amount of time bent forward with our butts up in the air. Usually we are so busy trying to touch our toes or get our heads to our knees that the last thing we are thinking about is whether our butts are covered or not. But, let me ask you this: Can you see through your yoga pants when you bend over in Downward Facing Dog or Standing Forward Bend? Do you know? Have you ever checked? You should. Or, ask a trusted friend to check for you. You might be surprised.

As a yoga teacher, I spend a lot of time walking around yoga studios adjusting and assisting people. I see a lot of people in Down Dog and lying down in Cobbler's Pose. Every week I see people who are wearing sheer yoga pants. Your pants might look opaque when you are standing upright, but as the fabric stretches over your knee or your buttocks, it thins out. It's pretty amazing how sheer some pants can get when they are stretched.

Now, I am a trained professional and ultimately I don't care.  It's not anything I haven't seen before. And most of the time I am checking on your alignment and your breath and not looking at your yoga pants one way or another. But, every once in a while I am surprised at how much I can see!  I wonder if you care.  Some people don't. But if you go to the grocery store after class, or to the hair salon, it might be a different story.  It's not like I can say anything right then, and there is nothing you can do about it in the moment, either. I wouldn't want to embarrass anyone. But I do recommend you do a pants check. You can either bend over in front of a mirror, or in front of a trusted friend. Or, before you get dressed, take one of your favorite pair of yoga pants and grab one of your canned goods from your pantry, something with a printed label.  Put the can inside your yoga pants and stretch the fabric tight over the can. Can you read the label? If you can, OH MY! That's pretty sheer! If you can't, your butt is covered. Those are good yoga pants!

Two pairs of yoga pants. Are all pants created equal?

Two pairs of yoga pants. Are all pants created equal?

You can actually read the label through these yoga pants!

You can actually read the label through these yoga pants!

These yoga pants will cover your butt!

These yoga pants will cover your butt!

Now, as for the guys....  Oh, can I actually go there?  I don't know.  I'll have to think about it!  That may be another blog post!

Surrender

surrender-300x200.jpg

I love my job! I love helping people by teaching yoga. I love sharing the stuff I am working on and the insights I have gained over the years of practice. I particularly love training people to become yoga teachers. It is such a transformative process to watch someone who loves to practice yoga turn around and share why they love it so much.

In the process of their learning, I ask my teacher trainees to prepare classes and quotes and themes. They all share such wonderful  and tender parts of themselves. The things that we share as yoga teachers are often the very things we are working on ourselves.

One theme that a lot of us need work on is the theme of surrendering. It is a great topic for a yoga class and for life as we often have to embrace change.  I also talked about surrender last week as it relates to letting go and relaxing in Savasana. This past week, one of my students read something about the topic of surrender that resonated with us all so much, we asked her to share it. Thanks, Brina. Here it is:

"When dogs play ball, they often want to repeat the joy of running after the ball again and again. Some dogs cling to the ball, not understanding that to keep playing, they must let go. When I desire to maintain an experience, I may get so attached to it I block the receipt of the very thing I want."

"Letting go of what I desire is the way to receive it. As I let go, I give over to spirit and trust that my desired outcome, or something better, will come back to me. Clinging stops the law of circulation.  the cycle of giving and receiving."

What are you clinging onto? Maybe it is the very thing that you need to release in order to invite more abundance into your life. What do you think? I'd love to hear your comments below!

Yoga for Plantar Fasciitis

I often get asked about yoga for various minor ailments.  One of them is plantar fasciitis.

From the Mayo clinic:
Plantar fasciitis (PLAN-tur fas-e-I-tis) is one of the most common causes of heel pain. It involves pain and inflammation of a thick band of tissue, called the plantar fascia, that runs across the bottom of your foot and connects your heel bone to your toes.

Plantar fasciitis commonly causes stabbing pain that usually occurs with your very first steps in the morning. Once your foot limbers up, the pain of plantar fasciitis normally decreases, but it may return after long periods of standing or after getting up from a seated position.

Plantar fasciitis is particularly common in runners. In addition, people who are overweight and those who wear shoes with inadequate support are at risk of plantar fasciitis.

Here are some simple exercises you can do that may help:

  1. Massage the bottom of your foot with a tennis ball.  Do this while standing and set a timer for 5 minutes.  Less than that just isn't enough.  Some people say to use a golf ball you keep in the freezer.  Because the tennis ball is softer, it may be easier to roll.  If you can tolerate a hard golf ball, go for it.  Because you have 5 minutes, work your whole foot–the heel, ball of the foot and arch. Vary the pressure.  Do both feet, 5 minutes each foot. Your other foot will thank you.

  2. Pick things up with your toes, such as the golf ball or marbles, or scrunch up a tea towel with your toes. This strengthens the arch. One of the causes of plantar fasciitis is weak arches. Often, this can be caused by wearing shoes with too much arch support and walking on engineered, smooth surfaces.  Wearing shoes with good arch support may relieve the symptoms, but it doesn't get at the root of the problem.

  3. You might not be able to do this one at home unless you have a 45-lb weight plate hanging around the house. So, head on over to the gym. You may need to bring your yoga mat with you as you will need to kneel on the floor. Find a quiet corner. Sit on your heels with your legs parallel and your toes pointing straight back. This pose is called Vajrasana. Have someone place a 45-lb. weight plate on your heels and calves. The plate should be pressing on your heel exactly at the same point as the pain is. Sit back on the weight plate. Try to sit for a few minutes, up to 5, but not longer. Some people may not be able to do this because of the pressure on the heel can be intense. But the way it works is that it relieves pressure on the plantar fascia. Some people love this.

plantarfasciitis1.jpg

I have never had plantar fasciitis, but my husband has.  He swears by the Strassburg sock.

plantarfasciitis2.jpg

The yogic version of the Strassburg sock is to do Pyramid Pose with your front foot up the wall:

plantarfasciitis3.jpg

Let me know if this works for you.  Leave a comment below!