Pose of the Month

The Benefits of Astavakrasana

Astavakrasana-SC-web-thumb.jpg

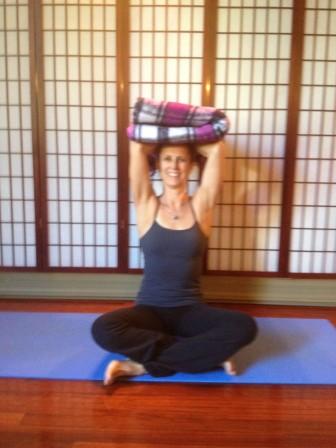
Why should we do this pose and what should you do if you can't do it?

If you look in Light on Yoga, Mr. Iyengar says that this pose strengthens the wrists, arms and tones the abdomen.  Surely there are other easier exercises that we can do to get those same results.  But, there is something empowering about the ability to support your body weight on your hands.  You don’t have to do Astavakrasana at all.  Ever.  But, take a look at the poses under each of the individual skills that build up to making this pose and see what you can work on.  Who knows, one day you may surprise yourself!

There are no poses that are absolutely mandatory to do.  But a lot of poses are just progressions of what is possible in strength and flexibility.  Yoga tests our limits, the edges of our comfort zones and where we are stuck.  One of my teachers always says, "In an ever expanding universe, there is always more."  For some that can be overwhelming, but it is not meant to be.  Can you just take a peak around the next bend?  Can you take the next step towards something?  We all know the concept that a business has to grow in order to continue.  How about ourselves?  What happens to us if we don’t continue to grow?  The Bhagavad Gita teaches us to take the actions for the sake of being alive but to let go of the fruits of our actions. There is no pressure to perform, you just show up and do the next thing.

Like any large task that is overwhelming, you can break it down into its smaller components.  Let’s take Astavakrasana  apart and look at each piece.  Work on each component without any thought of the next step until you get there.

Hip flexibility: Getting your leg over your shoulder.

Lizard-Lunge-R-web-large.jpg

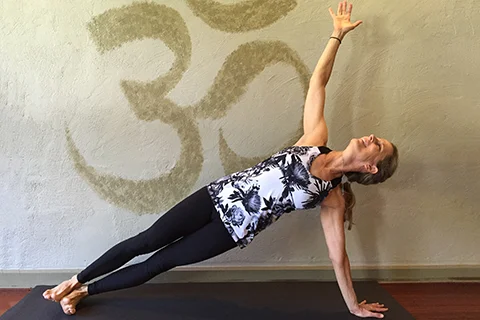
If you can do Side Angle Pose, can you do Bound Side Angle Pose?  If you can't do Bound Side Angle Pose, try Lizard Lunge.  After Lizard Lunge, can you now approach Bound Side Angle Pose better?  What would happen if you were to try Lizard Lunge every time you practiced?  In Lizard Lunge we are working the hip flexibility to be able to get the shoulder under the thigh; this is the flexibility you need to bind in Side Angle Pose.  The ability to bind in Side Angle Pose is the same flexibility to get the leg over the shoulder in Astavakrasana.  Notice in this picture that you can see my right knee above my back.

Shoulder Flexibility: The ability to bind the arms.

Uttanasana-with-Yoga-Mudra-web-large.jpg

One of the poses I like to do in almost every class is a forward fold with the hands clasped behind the back.  Because everything is our lives is usually oriented in front of us, we tend to constantly be reaching forward.  This and poor posture causes our shoulders to round forward.  Stretching the arms behind the back stretches the front of the shoulder.   This is the first step in the flexibility to bind.  Practicing Marichyasana I is a good pose to work on your bind.

Marichyasana-I-web-large.jpg

Twisting: the ability to connect your opposite elbow and knee together.

Parsva-Bakasana-head-on-web-large.jpg

A twist is defined as the hips and shoulders rotating 90 degrees from each other.  Usually one part of the body stays still while the other part rotates.  One of the aspects of a lot of twists in yoga is the ability to connect your knee with your opposite elbow.   Think of the ab exercise we call bicycling, where you are lying on your back and your curl your head and shoulders of the ground with your fingers interlaced behind your head and you try to touch your elbow to your opposite knee: your hips stay stationary and your upper body curls and rotates your shoulders.  You will see this same action in Revolved Side Angle Pose, Side Crow and Seated Twists.

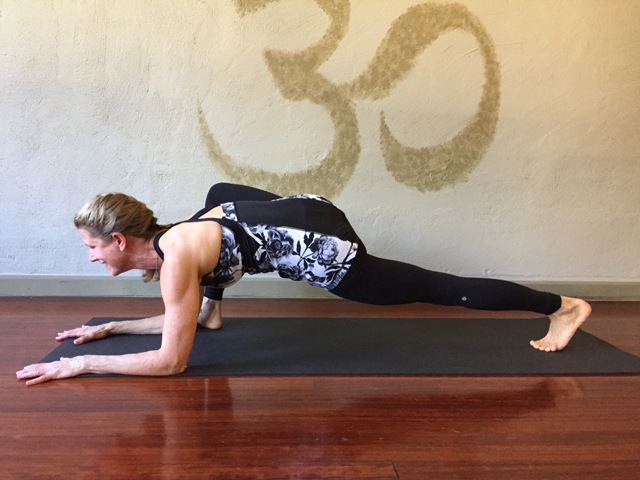
Upper body strength: the ability to do a Low Push Up.

Caturanga-KE-web-large.jpg

In Vinyasa classes, this is a pose appears a lot, but very few students do it correctly.  It forms the foundation of most arm balances.  I think most yoga students look for the flexibility in their yoga poses and are not as interested in the strength part.  Strength without flexibility is rigidity.  Flexibility without strength is instability. In yoga, as in life, we need both.  As we work on a Low Push up, we will also work on a High Push up, Side Planks and Reverse Planks.  Reverse Plank works on both shoulder strength and flexibility

Core strength: The ability to lift your lower body of the ground.

Astavakrasana-seated-version-web-large.jpg

As I teach my students in anatomy training: Our arms connect us to each other and our legs connect us to the earth.  Our core integrates the upper body and lower body together.  If  we are lacking a strong core, we risk injuring ourselves.  Boat pose is a great core strengthening posture.  If you add a twist to Boat Pose, you basically have the seated version of Astavakrasana.

The strength of the inner thighs; the ability to squeeze your legs to the midline.

Astavakrasana-arm-detail-web-large.jpg

Drawing into yourself is a challenging thing to do.  Ask most people if they meditate.  While they want to, it is not easy to do.  We are so outwardly directed.  Hugging to the midline is the physical action of drawing inward, of trusting our own instincts.  Being able to draw your legs in towards the midline is the key to balancing your legs on your bent elbow in Astavakrasana.  When things get difficult in a yoga pose, rather than turning inward to their own strength, they let go and move outward away from their core.  This is the same reason why it is difficult to sit in meditation, the lure of the outer world seems more important and better than the inner world.  Being able to hug your legs together  as you tip your head and torso forward in this pose is scary.

Your legs should hug towards the midline in almost every yoga pose that you do.  Try doing Warrior II with your front foot on a sticky mat and your back foot on a blanket.  Start with your feet together, front foot turned out 90 degrees and back foot perpendicular to the front foot.  Let your back foot slide back a few inches and then draw it in.  Don’t go too far at first, or you may strain yourself.  Go progressively further as you get stronger making sure that your back toes don’t turn out.  If your back toes turn out you will use your glutes and in this case you want to use your inner thigh muscles.

As one of my teachers in art school used to quote Mies van der Rohe all the time:  "Develop an infallible technique and put yourself at the mercy of Inspiration."   Keep practicing.  I'll see you in class!

Karin

March Pose of the Month - Astavakrasana

Astavakrasana-SC-web-large.jpg

Astavakra is the name of a sage.  While still in his mother’s womb, he heard his father make several mistakes while reciting the sacred Vedas.  Hearing these, the unborn sage laughed.  The father became enraged and cursed his son to be born deformed, or crooked in eight places – Asta means eight and vakra means a crook, or a kink - literally eight crooks.  Astavakra’s father had been defeated in a philosophical debate by a scholar named Vandi.  When Astavakra became a sage and a great scholar he defeated Vandi avenging his father’s defeat.  Astavakra’s father then blessed him and he lost his deformity.

Astavakrasana was the first arm balance I learned, after Headstand, Handstand, Shoulderstand and Forearm Balance.  Perhaps that is the correct order of poses to learn before trying this arm balance.  I could do Astavakrasana way before I could do Crow.  I found it easy.  I wasn’t afraid of it the way I was of Crow, where I could fall on my face.  If I fell in Astavakrasana it seemed I just crumpled to the floor.  I was more confident in Astavakrasana.  This makes me think of what other qualities you need to bring to your poses besides strength and flexibility.  To do this pose of the month you do need the strength of a good, solid Caturanga, you also need the flexibility to twist – so you will see a lot of that in classes this month.  But, in order to attempt a posture like Astavakrasana you need courage to try.  You need the fearlessness of not being afraid to fall – and of putting a blanket down as a crash pad to help you overcome that fear.  You also need the confidence in yourself.   Those are the yang, or masculine qualities you need for this arm balance.  You also need some yin, or feminine qualities such as enthusiasm, playfulness and yielding.  While you need to bring these qualities to your practice of  Astavakrasana, this arm balance will also bring out these qualities in you.  Are you ready for a month of working playfully?  I’ll see you in class!    Karin

2017 Postures for the Year

The following is a list of the Postures of the Month for 2017.

January - Plank poses and all of their variations:  High Plank, Low Plank, Side Plank, Reverse Plank, Handstand and Headstand.

Karin in Vasisthasana

Karin in Vasisthasana

February - Dwi Pada Viparita Dandasana or Kapotasana - Wheel on your forearms or Full Pigeon

Kapotasana by Cailen Ascher

Cailen in Kapotasana

March - Astavakrasana - Eight crooked places pose

Karin in Astavakrasana

Karin in Astavakrasana

April - Eka Hasta Adho Mukha Vrksasana - One arm Handstand

(Pic Coming Soon)

May - Padmasana - Lotus

Karin in Padmasana

Karin in Padmasana

June - Natarajasana - Dancer's Pose

(Pic Coming Soon)

July - Visvamitrasana or Hanumanasana -  Side Plank, bottom leg lifted or Split

Karin in Visvamitrasana

Karin in Visvamitrasana

August - Prasarita Padottanasana to Sirsasana II -  Wide-Leg Forward Fold to Headstand

Karin in Sirsasana II from Prasarita Padottanasana

Karin in Sirsasana II from Prasarita Padottanasana

September - Salabhasana/Locust

(Pic coming soon)

October - Eka Pada Koundinyasana I

Karin in Eka Pada Koundinyasana I

Karin in Eka Pada Koundinyasana I

November - Dancing Warrior Series

(Pic coming soon)

December - Choice of Restorative Pose

Karin in Supta Virasana

Karin in Supta Virasana

Pose of the Month – Kapotasana

Kapotasana by Cailen Ascher

Kapotasana by Cailen Ascher

In Light on Yoga, Mr. Iyengar rates Kapotasana, or Full Pigeon a  21/60.  He rates One-Legged Pigeon pose as a 28/60.  Yet, you tend to see One-Legged Pigeon pose more frequently than you do the full pose.  Why is that?

There are versions of One-Legged Pigeon pose that are available to most people.  While we might do One-Legged Pigeon with a thigh stretch, most students don’t do the full pose, where you grab your back foot with your arms overhead and rest your head on your foot.  The versions where you don’t hold the back foot are easier.

But there is something to the ordering of the postures.  Full Pigeon is not an easy posture, but since it is symmetrical, it is easier on the body than its asymmetrical relative.  If you can do full pigeon, it is easier and safer to work on that rather than One-Legged Pigeon.  The difficulty with asymmetrical postures such as One-Legged Pigeon is that one leg is in a forward bend, the other leg is in a back bend and the pelvis takes all the stress if the hips cannot be maintained in a square and neutral position.  In order to be able to protect our spines we want to move from the big joints first.  That means that the hips and shoulders need to be open before we move the spine.

As we work on Kapotasana this month, let’s focus less on the end result of a particular pose, but rather we can work on opening the body in preparation for any back bend.

Let me suggest the following progression, not as a sequence but as an order of accomplishment:  Cobra, Locust, Bow, Camel, Wheel, Full Pigeon, One-Legged Pigeon.

Backbends are considered heart opening postures because of the lift in the chest.  Kind of appropriate for February, don’t you think?   I’ll see you in class!   Karin

It’s Ten O’clock.  Do you know where your feet are?  

The original question, “It’s 10:00 pm, do you know where your children are”, somberly intoned just prior to the local news, was eventually parodied by a multitude of stand-up comedians, novelty song artists, and horror movie posters. But the original intent of the line was very serious. The phrase shows up in lots of places.  I have to admit I like to use it in my yoga classes, particularly to draw a student’s attention to a leg that is raised behind them or some other body part they cannot see.  Often the body part is hanging out behind them kid of lifelessly.

In yoga poses, the whole body should be participating.  Yoga means union of mind body and spirit.  We do our yoga poses with our whole bodies.

Often beginners can only pay attention to one body part at a time, but as we progress, and our practice becomes more integrated, we can cast our attention over our whole body.  While this is relevant in all poses, this week I will talk about having your attention on your feet while we are doing planks.

While most planks are felt in the arms or the core, the more the legs and feet work, the easier the postures are to hold.  When the feet and legs are strong, it is easier to keep the core engaged.  One of your core muscles, the psoas, attaches to your lumbar spine and to the upper inner aspect of your thigh bone.  If the legs aren’t activated, this muscle is not activated.  In my Yoga Teacher Training Program, we study the muscles one at a time as if you could activate one muscle and not the one next to it.  But the body doesn’t work that way.  The muscles are often affected by the surrounding muscles.  If you activate the feet and legs in plank, they help to hold the whole body up.  Imagine the difference in picking up a sleeping child as opposed to a child who is actively participating in being picked up.  One is a limp pile succumbing to gravity and the other one helps you.

Here is an example of what I often see student’s feet doing in Side Plank:

Vasisthasana-feet-collapsed-web-large.jpg

Here is what they could be doing:

Vasi-feet-engaged-weblarge.jpg

Here is what I often see from behind when students are in Plank:

Plank-feet-splayed-web-large-e1485133871101.jpg

Here is a picture of feet and legs actively participating in Plank Pose:

plank-feet-engaged-web-large-e1485133938878.jpg

Do you know what your feet are doing in these poses?  Working your feet and keeping your legs engaged will help you in your plank.

Come to class.  I’d be happy to help you.

Vinyasa Pose of the Month for January – Planks

Yoga is a balance of strength and flexibility.  We need to be strong but not rigid.  Being strong gives us a firm foundation and clear boundaries.  Being rigid keeps us stuck, frozen in one place.  In being flexible, we need to be resilient, able to change and go with the flow, but not so flexible that we can be pushed over.  This is as true in our yoga postures as it is in life.

Vasisthasana-KE-web-large.jpg

We will begin this year by developing our strength by working our core in the various forms of Plank Pose.  Our core connects our upper body and lower body together, protecting our spine and integrating our postures. Think of Plank Pose as Tadasana in alternate relationships to gravity using different arm positions.   Tadasana is the first version of Plank.  Use this posture to check your alignment for each of the other versions.  Each version of Plank should still look like Tadasana.

There is Plank pose with the arms held straight out in front of the body.  You can do Plank pose on your hands or on your forearms.  The forearm version is not just for people who have wrist issues.  When practicing Forearm Plank, make sure that you keep your forearms parallel.  In either version of Plank, make sure your hips are in line with your body, not high like a tent and not low like a hammock.  There is also a moving version of Plank called “walking plank”.  This is where you transition back and forth from Plank on your hands to Plank on your forearms, one arm at a time.

Caturanga Dandasana, or Low Plank is a harder version of Plank and relies more on upper body strength than just core.  Make sure that your elbows are stacked over your wrists and your shoulders are kept in line with your elbows as you hold this pose.

The next version of Plank Pose is with the arms straight out from the shoulders in the side plane.  This is Side Plank or Vasisthasana. It works your oblique muscles, or the abdominal muscles that wrap around the side of your body.  Even though the body is tipped over sideways, it should still look like you are holding Tadasana.  Don’t sag or arch!

You may have never thought of Handstand as a version of Plank, but it is Plank with the arms overhead.  Again the body should look the same way it does in Tadasana.  It should not look like a banana.  If the ribs flare out you have lost your core.  Of course, there is a Scorpion version of Handstand that is more difficult.

Reverse Plank is the last version, with the arms in the back plane of the body.  This works the muscles in the back plane of the body including your hamstrings and glutes.  People often think of core as just abs, but the posterior chain muscles are just as important to keeping our spine stabilized, supported and our posture well integrated.

Working our core in these versions of Plank Pose will set us up for a great beginning to a New Year!

I’ll see you in class!

Karin

Learning to Relax.

Savasana-Karin-web-large.jpg

The pose of the month for December is Savasana.  That does not mean that we will spend the entire class in Savasana.  Just like every other pose of the month, we will spend maybe 10 or 15 minutes working on the featured pose.   (And, if you are lucky, you will get a lovely Savasana assist by yours truly!)

So what do we need to work on in Savasana?  Aren’t we just supposed to relax and do nothing?  Absolutely, but how many of us can do so?  I know many students who cannot stay for Savasana.  They don’t see the value in “doing nothing”.

But relaxation is so important, it breaks the stress cycle.  We all know how stress is bad for our body and immune system. (You can read about how harmful stress is for your body here.)  While we cannot avoid stress in our lives, we can take steps to promote relaxation and Savasana is one of those ways.

We live in a high stress society.  I am amazed at how many people cannot relax.

All during class I am cueing, cajoling and encouraging my students to engage this, or straighten that, or hug towards the midline, or extend out.  When we finally get to the end, it is time to relax and let go.  Often a strong and sweaty practice is conducive to letting go.  But, I am surprised at how much tension some students can still be holding onto in their bodies during Savasana.

Sometimes during final relaxation, I will go around and adjust a few people. I usually let people know I will be doing this so I don’t startle anyone (and I allow people to opt out).   I approach them quietly and touch them gently before lifting their arm up and slowly wiggling it.  If they are relaxed, the arm should move like the empty sleeve of a jacket.  But more often than not, the arm comes up rigidly and the person moves the arm with me, anticipating which way I am going to wiggle it.  Some students are unconsciously helping me, even though I tell them I don’t want them to help.  It is not unusual for the arm to stay up in the air even after I have let go of it.  When I quietly tell the person that if they were relaxed, the arm would not stay up in the air by itself, they often smile and let the arm down.  Then I begin again.  I ask students to “let go”, to “play dead”, “relax”.  Some people simply cannot do it right away.  It takes practice.  We are so used to being on guard, to protecting ourselves from being taken advantage of, of not allowing ourselves to be vulnerable.  The result is that we cannot let go.

I discovered what I need to do is to prepare people for relaxation; to tell them at the beginning of class what they need to do at the end, to describe what I see and feel in people’s bodies when they are tense.  This seems to help a lot.  In a society that values doing over being, we need instructions on how to relax.

Here are some tips on how to relax:

  1. Plan a place and time to relax (if this is done outside of your regular yoga class.) Showing up is 80% of the work!

  2. Determine the amount of time you have to relax and set a timer. It is easier to relax when you know how much time you are willing to give.

  3. Make yourself comfortable. You should be lying down on the floor.  Place a blanket under you if the floor is hard and you are not on carpet.  Use blankets, bolsters or pillows to support your body in away way to insure you stay comfortable.

  4. Make sure you are warm. As you lay still you will feel cooler than when you were moving, particularly if you were sweaty.  Put on an extra shirt, socks or even cover yourself with a blanket.

  5. Use an eye pillow, if you like, or cover your eyes with something like the sleeve of a shirt or a hand towel. This does two things for you: First, it creates darkness which is more conducive to relaxing.  Second, it weighs the eyes down and helps to keep them from moving around.  (You don’t need something heavy on the eyes, just a gentle suggestion of weight.) Eye movement stimulates the brain and we want the brain to slow down as part of the process of relaxing.

  6. Commit to stillness. Sometimes when I lay down for Savasana I may feel as if I am too fidgety to relax and all of a sudden I have these itches and twitches and urges to move.  90% of the time, if I ignore these urges, they will go away.  It seems that they are the mind’s resistance to staying still.  The mind wants to be stimulated.  If I am able to resist movement I begin to relax.  Now, 10% of the time, you may actually have to scratch that itch, move your leg or grab another pillow.  You have to use common sense here, but don’t be fooled by your restless, monkey mind or you will never be able to relax.

If you don't have the time or inclination to relax at home make sure you come to class during the month of December to work on it.  You’ll be glad you did!

Come on!  I know what you really come to class for:

savasana-t-shirt.jpg

I’ll see you in class!

Karin

Savasana or Final Relaxation Posture

Savasana-Karin-web-large.jpg

The word Sava means a corpse.  In Savasana you are meant to imitate a corpse, to play dead.  This is often the hardest pose.  I know some students who cannot stay for Savasana because they see it as a waste of time; they cannot stay still.  By remaining motionless for some time and keeping the mind and body still while you are fully conscious, you learn to relax.  In the beginning, you may fall asleep.  This is ok.  It just means that you are really tired and probably are not getting enough sleep.  However, after a while, you should not fall asleep.  Conscious relaxation invigorates and refreshes both the body and the mind.  With practice, the mind learns to follow the breath, stay focused and fall into light meditation.  The posture is then extremely restorative and refreshing.

During the month of December, we will focus on Savasana.  It’s not that we will spend more time doing Savasana, we just might focus on different versions of it:  supported, side-lying, or prone.  The busy days preceding the holidays are often a great opportunity to practice conscious relaxation.  It is especially important to maintain your yoga practice and to find some time every day to sit quietly and meditate.

Pose of the Month for October - Tittibhasana or Firefly

Tittibhasana-mp-copy-web-small.jpg

The word Tittibha means an insect like a firefly.  This is an arm balancing pose where the torso and legs are in a Wide-legged Seated Forward Fold and the arms are doing the same work as in Crow.

That should give you an idea of some of the warm ups and modifications for this pose:  either seated or standing Wide-legged Forward Folds  and Crow.

Since this pose requires a deep forward folding ability we will be working on stretching the hamstrings and glutes in postures like Triangle, Pyramid and Gate Pose.

In addition, we will keep working on opening the hips with poses like Warrior II, Cobbler's Pose and Lizard Lunge.

We’ll stretch the upper back with our arms in Eagle pose.

Since this pose starts from a squatting position, you should expect to work on stretching the quads and calves in order to come into a deep squat.   Oh, and let’s not forget some abdominal work in Boat Pose. Does that have your mouth watering for the month of October?  I hope, so.  I am excited.  And don’t worry; “While it is nice to have an end to journey towards, it is the journey that matters in the end.”  (Ursula LeGuin)   I’ll talk you through it.  It will be fun!

I’ll see you in class!     Karin

The King of Asanas - Sirsasana or Headstand

Sirsa means head, Asana means posture. This posture is head posture or Headstand.

Sirsasana-1-side-view-web-small.jpg

One time, many years ago, my doctor was asking me about my yoga practice.  I was suffering from headaches and I told him that if I did my yoga practice and did Headstand, that my headache would go away.  He told me that if God wanted us to stand on our heads, he would have built us upside down.  I decided to not talk to my doctor about my yoga practice anymore.  He couldn’t understand why on earth anyone would want to stand on their heads.

As a yoga teacher, I realize that Headstand is not for everyone.  But I like to do it, and I feel that it helps me focus, gain clarity and get a new perspective on things. If you look in Light on Yoga,  Mr. Iyengar will tell you that it is good for a lot of other things as well.  He calls it the King of all Poses.  He says that its mastery gives one balance and poise, physically and mentally.  And it used to help a lot with my headaches!  In yoga we regularly engage our bodies in different relationships to gravity to help build strength, awareness and integration.   As part of my Iyengar yoga practice, we did Headstands regularly.  I think regularly is an important word here.  I don’t think doing random Headstands is a good idea.  And I think that students who come in new to an ongoing class should be patient and wait until they are ready and strong enough to do Headstand.

How do you know that you are ready and strong enough to do Headstand?  First, the idea of doing Headstand doesn’t strike fear into your heart.  Doing a pose with fear causes you to contract.  Moving into any pose with fear and contraction is not good.  Second, that you have no neck issues to start with.  Third, your neck is strong.  Lastly, you know how to muscularly engage your body to make it strong and stable, not loose and floppy.  Mr. Iyengar often describes this as being “poker stiff”.  Stiff is not often a word you would associate with yoga, but it means that one part won’t sag, think of the whole body as being engaged.  Sagging in Headstand, especially in the neck is not desirable.

Sirsasana-blanket-compressed.jpg

As we work on Headstand this month, I would like to offer a few alternatives for those of you who might not be ready to go upside down.  First, let me say that I am not a big fan of Legs-up-the-Wall Pose as an alternative for Headstand. Headstand is a fiery pose, it heats you up, and it demands a lot of energy.  Legs-up-the-Wall-Pose is not a fiery pose, it is cooling and it does not demand any energy. It is very relaxing.  It is a good alternative for Shoulderstand, but not Headstand.  If you are doing an alternative pose, it should be form-wise and energy-wise related to the main pose.  Here are some suggestions for alternatives to Headstand:

Sitting or standing upright, with your hands clasped behind your head (like Headstand), supporting a blanket on your head and forearms. (This is more taxing than it looks!) (Sorry the picture is out of focus.  I’ll have to take a new picture!)

Doing “Airplane” on your knees, with your head into the wall.

Sirsasana-airplane-compressed.jpg

Doing Dolphin Pose.

Dolphin Pose

Dolphin Pose

Horizontal Headstand. This is where you are supine with a block under your head, your shoulders and your heels.  You press into your heels and lift your buttocks off the floor. To make this feel even more like the real thing, interlace your hands behind your head and draw your elbows towards each other so that they are shoulder width apart.

(Sorry, I don’t have a picture of this one, yet.)

You may wonder how come I don’t mention right angle Headstand (like right angle handstand).  The simplest explanation is that if you are not perfectly vertical in Headstand, then the angle will put strain on your neck.  This is less critical in handstand where you adjust your shoulders to the angle of your pose.

Every pose has its benefits and its detriments.  Every pose has a counter pose to offset its detriments.  The counter pose to Headstand is Shoulderstand.  If I teach Headstand in my classes, I usually end with Shoulderstand.  Fish is the counter pose to Shoulderstand; and the counter pose to fish is Savasana.

This will be an exciting month as we work on going upside down.  I hope that this is enough to get you started.  If you have any questions, feel free to ask me.  Here is a link to some FAQ’s about Headstand to check out first.  I’ll see you in class!

Karin