Poses that you need to know how to do in order to do Wheel

The first pose that indicates a readiness for Wheel isCaturanga Dandasana, or low push up. This pose requires arms strength and it activates the muscles in theback which have to contract to lift your body up into Wheel. It is important totone the muscles that lift the body into Wheel, otherwise the flexibility willinvite weakness and pain for which beginners “have to pay heavily”, accordingto Geeta Iyengar. 

Caturanga-KE-4-x-6.jpg

Then the back bends, in order of learning:

Prone Position:

Back arches are introduced in the prone position first:  Up Dog, Bow and Locust.  These poses are done from the more externalspinal muscles.  If the back hurts inthese positions, it indicates a defect in either the spine or spinal musclesand it is necessary to correct these problems before moving on, or the problemscan cause pain especially as the poses progress.

Upward Facing Dog

Up-Dog-Cornerstone-2-L-4-x-6.jpg

There are two ways to position the feet in both Caturangaand Up Dog.  One is to be on the balls ofthe toes and one is to be on the tops of the feet. The first way tones the legmuscles and the second way tones the spinal muscles.  This is important because back bends are donefrom leg strength.  If the leg musclesare not strong enough to hold, that translates into pain in the spine,particularly the lower back.    Therefore, one should tone the legs and thenlearn to adjust the spine by making the leg muscles strong.

Bow

bow-pose.jpg

In this pose, the body rests only on the abdominal area.  Keep a firm grip on the ankles and useresistance between the legs and arms to raise the legs and chest further.  Try to raise the knees and shoulders the sameamount.  Often it is easier to raise oneor the other more.

Locust

Salabhasana-web-large.jpg

In Locust, learn to work on the thighs and chestsimultaneously to keep them above ground and, as in bow,  give them an equal amount of lift.

Locust and Bow act to strengthen the back and exteriorspinal muscles.

Camel

camel-we-large.jpg

This is the first pose where you are lowering yourselftowards the floor rather than lifting up away from it.  In the beginning the knees and feet are hipwidth apart.  As you progress in thisposture, it is harder and more advanced to have the knees and feettogether. 

Up Dog and Camel are preparatory poses for the more advancedback bends such as Wheel.  IN performingthese postures, the student is asked to reflect on the curvature of the spineand the evenness of the spinal muscles. Does the spine bend more easily in one area than another?  The work here is to create an evenness in thespine and muscles.  

Often, while doing backward extensions, students experiencebreathlessness, hyperventilation, nausea, and headache in addition tobackache.  They feel nausea and dizzinessas if they are having an attack of vertigo. It is mainly because of the stiffness of the spinal muscles andsluggishness of the liver.  These twoasanas prepare the student, not only at the physical level but also at themental level, for removing such obstacles.  

Wheel

Once you are proficient in Up Dog, Bow, Locust and Camel then Wheel will come easily.

This version of Wheel looks more like an upside down letter "U".

Stretches to open your upper back for Wheel

Here are two great stretches to open up your upper back toprepare to do Wheel:

For this first one you can start in Hero, Crossed Leg Pose or simply stretch your legs straight.  Using 2 blocks, make sure one block is under your upper back, between your shoulder blades.  The other block is under your head. You can start with both blocks on the high side, if possible.  Hold for 1 minute with the arms overhead holding opposite elbows. If you place the block under your head strategically, you will be able to rest your forearms on the block.

Paryankasana-high-blocks-web-large.jpg

Then lower the head block to the medium height.  Switch the way you are holding your arms and, if your legs are crossed, change the cross of your legs.  You only need a small portion of the block for your head to rest on. Let your forearms rest on the block, too. Hold for 1 minute.

Paryankasana-middle-block-web-large.jpg

Then change the block to its lowest side, if you can.  Again change the arm cross and the leg cross.  If the head does not touch the block, then either put something on the block to make up the difference or stay at the height of the block where the head is still supported.  Hold for 1 minute.

Paryankasana-low-block-web-large-768x1024.jpg

Finally, I went to no block and head on the floor.  Go only as low as you can keep the headsupported on something.  Hold for 1minute.  When finished, come out slowlyand come onto all fours and do a couple of cat and cow stretches. 

Paryankasana-no-block-web-large.jpg

For the second one, place two blocks in front of a chair so that you can sit on the blocks and lay your upper back over the chair. Make sure that your head and shoulders are resting on the chair.  Lift your buttocks up so that you are in a straight line from your knees to your head.  Thread your hands through the back of the chair and either hold your arms straight and squeeze a block between your hands or bend your elbows and grab the back rung of the chair.  Keeping your shoulders and head on the chair, begin to lower your buttocks toward the blocks without tilting your chin up. You end up using the front edge of the chair seat to leverage your upper back open.   Hold for about 10 seconds and try to find 2 other spots on your back to leverage over the front edge of the chair.  When finished, release your hands, slide your buttocks carefully down to the blocks and sit up. 

pinca-prep-chair-stretch-e1567556898449-1024x768.jpg

The Science of Yoga: The Risks and the Rewards by William J. Broad

This book came out in 2012.  I had read the New York Times review of the book and never wanted to read any more.  I think I was afraid that, by listing all of the risks, the book would ruin all the things I loved about yoga.  But I have to remind myself that the book also lists the rewards, too.

When my friend and mentor, Mel Robin, was downsizing and moving out of his house, he invited me to come over and take some of his vast book collection.  The Science of Yoga was one of the books I took.  It sat on my shelf for a while until I recently decided to pick it up.  In the prologue of the book, it mentioned MelRobin.  Well, that piqued my interest! I also saw that the author used Mel’s extensive work on the science of yoga as are source for his book.  It was this connection that caused me to commit to calling Mel up to make a lunch date.  And that is when I discovered that he had just passed away.

What we in the west have come to practice and know as yoga is very different from its ancient roots.  Read along with me to discover those ancient roots (some of which may surprise you!) and see what science can tell us about this ancient and ever evolving practice.

Urdhva Dhanurasana

Urdhva means upwardfacing and Dhanurasana means bow.  That would make this pose Upward Facing Bow Pose.  However, it is more commonly called Wheel (even though the Sanskrit word for wheel is Chakra – go figure).  Regardless of what we call this pose, it is a big back bend. 

This version of Wheel looks more like an upside down letter "U".

To prepare for Urdhva Dhanurasana we need to open our shoulders, upper back, front of the hips and front of the thighs.  If these parts of the body aren’t open enough, we might feel pain in our low backs, wrists or neck.  The hips and shoulders are the most moveable parts of the body.  But, if they don't have their optimum range of movement, then the wrists, elbows, neck, knees, ankles and low back can take the strain because they are often asked to move more than they should.

Often students will ask me how they can stretch their wrists because that’s where they feel the most pain when they do Wheel. Often the site of the pain is not the cause of the pain and this is true with the wrists in Wheel.  If you are feeling pain in your wrists during Wheel, or other poses where the hands are part of the foundation, the reason for the pain is most likely because of restricted movement in your shoulders.

This month, we will explore opening your shoulders, and hips as we work on Wheel.  You’ll learn to recognize where you are stuck and where you should spend some time in your home practice to improve your ability to do Urdhva Dhanurasana.

Here are some exercises to do for your yoga homework to improve your Wheel.

Are your shoulders tight? Do your wrists hurt when you do Wheel?

Set up for Wheel with your head and forearms touching the wall.  When you come up into Wheel this way, it gives you a sense of direction. The idea is to move your chest towards the wall. If your chest is far from the wall, then your wrists will be bent at an acute angle. (Your wrists are not meant to be bent at an angle less than 90 degrees!) Have someone take a picture of you in Wheel and see how far your chest is away from the wall. When you look at a picture of yourself in Wheel, you should look more like an upside down "U", and less like an arc of a circle. If your chest is far from the wall and you look more like an arc of a circle, then you need to do some stretches to open up your shoulders.

To improve the flexibility in your shoulders do this stretch everyday:

Cow Face Arms. Extend your right arm straight up to the ceiling. Bend your elbow and pat yourself on your back with your right hand, dropping it down behind you from above. Take your left arm and swing it up behind your back, trying to reach your top hand with your bottom hand. If you cannot connect your fingers together, dangle a belt down from the top hand and grab it with the bottom hand. Do this three times on each side, holding for 10 to 20 seconds each time.

Gomukhasana-with-belt-web-large.jpg

Cow Face Arms with a belt. If your shoulders aren't open enough for Wheel - you will probably need a belt to do this pose.

Are your hips tight? Can you keep your heels on the floor in Wheel?

To improve the flexibility in your hips do this stretcheveryday:

Thigh stretch at the wall.  Slide your left shin up the wall and bring your right foot forward into a lunge position.  Can you get your left knee to the wall with your hips level?  Make sure that your knee is behind your hip and straight down, not in front of your hip and slanting out to the side.  Do this every day, three times each side, holding for 20 to 30 seconds at most on each side. 

Pigeon-thigh-stretch-web-large.jpg

Pigeon Thigh Stretch at the Wall. If this is hard to do and be in good alignment, then your hip flexors are probably hard for you to keep your heels down in Wheel.

It would be nice to take a "before" picture at the beginning of the month and an "after" picture at the end to chart our progress. What do you think? Are you in?

This is not your mother's chair yoga

Visvamitrasana-with-a-chair-4-x-6.jpg

Visvamitrasana with a chair.

Sometimes I've had people walk out of class when I ask them to grab a chair as a prop. But this is not for the kind of chair yoga that most people think of. In the Iyengar style of yoga which I study and practice, a chair is used to help support the body as you open into greater ranges of strength and flexibility. Check out this way of entering into Visvamitrasana using a chair. Elevating the pose off of the ground by using a chair makes the pose that much easier and more accessible. Give it a try and let me know what you think.

Please Don’t Do This Version of Side Plank

Please Don’t Do This Version of Side Plank

A good, strong Side Plank is the basis forVisvamitrasana. As such, I’d like topoint out some helpful and some not so helpful variations for this lateral armbalance.

Side Plank is a great pose for core strength and balance,but it can be a difficult pose for beginners or for people with shoulderissues. There are several modificationsfor this pose: for the arms and shouldersand for the legs.

Three pre-requisites for Visvamitrasana and one modification.

There are three poses that are essential to be able to do well before you attempt Visvamitrasana.  The first one is Triangle with your hand on the floor, the second one is Side Angle Pose with your hand to the floor and the third is Side Plank.Triangle pose is the first pose that students learn that stretches the hamstrings.  At first it is hard to get the hand to the floor, but over time, as your flexibility improves, it may become possible.  However, don’t sacrifice the opening of the chest to get the hand to the floor.The second pose is Side Angle Pose.  While it is not necessary to be able to do Side Angle Pose with your hand on the floor, in order to do Visvamitrasana it is.The third pose that is important is a good strong Side Plank.  Work on your ability to hold Side Plank for a minute.  Make sure that the chest is open in Side Plank the same way it is in Triangle and Side Angle.If Visvamitrasana seems impossible, there is a “Half” version.   This is where you start from a kneeling position.  You can even place the raised foot on a wall for better stability.Here is a sequence for Visvamitrasana.  I will be using elements of this in class this month.

Reclined Hand to Big Toe Pose, leg straight up and out to the side

Active Supta Padangusthasana or Hand to Big Toes Pose

Seated Side Stretch

Sukhasana-side-stretch-4-x-6.jpg

Triangle

Trikonasana or Triangle Pose

Side Angle

Side Angle

Bound Side Angle Pose

Bound Side Angle Pose

Gate Pose

Parighasana-KEy-4-x-6.jpg

Revolved Seated Tree

Parivrtta-Janu-Sirsasana-KE-4-x-6.jpg

Side Plank

Karin in Vasisthasana

Half Visvamitrasana

Ardha-Visvamitrasana-4-x-6.jpg

Full Visvamitrasana

Visvamitrasana-KEy-4-x-6.jpg

Ego and the Current State of Humanity

Words, Tolle points out, no matter whether they are vocalized and made into sounds or remain unspoken as thoughts, can cast an almost hypnotic spell on you.  You can easily lose yourself in them, become hypnotized into implicitly believing that when you have attached a word to something, you know what it is.  The fact is: You don’t know what it is.  You have only covered up the mystery with a label.  Everything, a bird, a tree, even a simple stone and certainly a human being, is ultimately unknowable.  This is because it has unfathomable depth. All we can perceive, experience, think about, is the surface layer of reality, less than the tip of an iceberg.

Words help create form.  Ego is always identification with form, seeking yourself and thereby losing yourself in some form.  Forms could be material objects, but they could also be the forms of thought that continuously arise in the field of consciousness.  The following list are some examples some of the forms that we identify with.

Words and labeling – allow us to pretend we know something because we have identified it and attached a label to it.  It fits into our preconceived idea of what it is.  It allows us to not dig any deeper.

Possessive pronouns.  Once we attach the words: I, me and mine to anything, it becomes a part of who we think we are and shores up our ego.  If something happens to our stuff, we suffer because our stuff is an extension of ourselves.

The voices in our head.  Often we confuse the thoughts swirling around in our heads with who we are.  This coincides with the Cartesian idea of “I think, therefore I am.”  But, Jean Paul Sartre had the insight, long after the yogis did, that the consciousness that says “I am” is not the consciousness that thinks.  The only truth is that “I Am.”  If you identify with the thoughts in your head, you are lost in ego.  If you realize that you are not your thoughts, you are beginning enter into a new state of consciousness.

Identification with things and wanting more– Our ego often gets caught up in the identification with things.  The ego sees the car we drive or the clothes we wear, or the house we live in as a definition of who we are.  This identification with things can lead to wanting more as the newness of things wears off, or others acquire things that we think we should have.

Identification with the body.  The body is another symbol of impermanence.  What happens when youth, good looks and athletic prowess fade?  Who are we then?

The illusion of ownership – having vs. being.  The ego identifies having with Being.  I have, therefore I am.  But our satisfaction with having is relatively shallow and short-lived.  Concealed within it remains a deep-seated sense of dissatisfaction, of incompleteness, of “not enough”.  “I don’t have enough, yet.” By which the ego really means, “I am not enough, yet.”  We all know that expression, “You can’t take it with you.”  So what does it mean to really own something?  And if we lose what we own, are we diminished in any way?

Awakening can arise out of a sense of Being

Being.  Feeling the inner body or life energy = being.  Body awareness , not body identification, not only anchors you in the present moment, it is a doorway out of the prison that is the ego.  It also strengthens the immune system and the body’s ability to heal itself.  Body awareness is feeling the life force in your body.  Feeling that life force and that part of you that is aware that you are aware, is one of the first steps towards Being and Awakening.

Awakening can often happen after a sense of loss.

When forms that you had identified with, that gave you a sense of self, collapse or are taken away, it can lead to a collapse of the ego, since ego is identification with form.  When there is nothing left to identify with anymore, who are you?  When forms around you die or death approaches, you sense of Beingness, of I Am, is freed from its entanglement with form.  Spirit is released from its imprisonment with matter.  You realize your essential identity as formless, as an all-pervasive Presence, of Being prior to all forms, all identifications.  You realize your true identity as consciousness itself, rather than what consciousness had identified with.  That’s the peace of God.  The ultimate truth of who you are is not I am this or I am that, but I am.

Loss can cause an awakening, a dis-identification with form. However, it is also possible to create a strong attachment to being a victim of loss which can create a new contracted and more rigid form of ego.  Whenever loss occurs, you either resist it or you yield.  Some people become bitter or deeply resentful; others become compassionate, wise and loving.  Yielding means inner acceptance of what is. You are open to life.  Resistance is an inner contraction, a hardening of the shell of the ego.  You are closed.  Whatever action you take in a state of inner resistance (negativity) will create more outer resistance and the universe will not be on your side; life will not be helpful.  When you yield internally, when you surrender, a new dimension of consciousness opens up. If action is possible or necessary, your action will be in alignment with the whole and supported by creative intelligence, the unconditioned consciousness which in a state of inner openness you become one with.  Circumstances and people become helpful, cooperative.  Coincidences happen.  If no action is possible, you rest in the peace and inner stillness that come with surrender.  You rest in God.

Yoga and Jet Lag

Sure, yoga can make us stronger and more flexible, but the postures can do so much more for us if we know how to use them.  Each group of poses has a different energy and each pose within that group evokes that energy in very specific ways.  Knowing how to work with the energy of the poses can help you with such things as overcoming jet lag.

Conventional wisdom suggests that for each time zone you cross, it takes one day to adjust.  So, traveling can leave you unable to fall asleep at the right time and/or groggy and lethargic when it is time to get going.

To work with jet lag, it is helpful to know which poses are energizing and which ones are quieting.  This knowledge can help you fall asleep or help clear out your brain fog.  Otherwise, your yoga practice can work against what you are trying to do.  You can also use specific yoga poses to open the hips and relieve the low back which are two other problems associated with travel.

General categories of poses

Sun Salutes are energizing.  Use any variation of Sun Salute, even if you make up your own, to help get you going in the morning or during a mid afternoon slump.  Don’t use them at night, however, as they may stimulate you so much that you have trouble falling asleep.

Standing Poses are grounding and energizing.  They help connect our legs and feet to the ground and to the time and place we are in.  They help us establish pose and presence.

Standing Balancing Poses are focusing and energizing.  If you are truly jet lagged and exhausted, you may find it difficult to balance.  In that case, work on Standing Poses and your core and then see if your balance improves.  Or, just give yourself a day or two and try again.

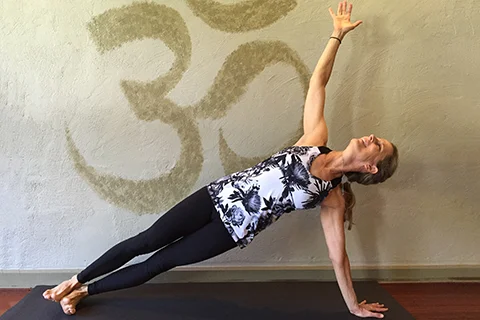
Hand and Arm Balances are energizing and empowering.  They can help you feel strong and confident.  Use these poses to help get your ready to take on your new surroundings. Make sure you warm up before tackling this category of poses.  Do a few sun salutes with some time in Down Dog, at least.  Doing handstands without warming up properly is very hard on your shoulders, wrists and elbows which are not accustomed to holding all of your body weight.

Inversions refer to Head Stand and Shoulder Stand.  These poses are often done together and counter balance each other.  Leave them out if they are not part of your regular practice.  Head Stand is fiery and focusing.  Shoulder Stand is nurturing and relaxing.  Headstand clears your head and dispels extraneous energy which allows you to calm and quiet down in Shoulder Stand.  These two poses together are often prescribed or sleeplessness.  However, it is important to prepare yourself properly before doing Head Stand: do Child’s Pose, Down Dog and Standing Forward Bend to help regulate your blood pressure before going upside down in Head Stand.

Hip Openers are used to relieve the legs and low back from a lot of sitting.  These are poses like Cobbler’s Pose, Seated Wide Legs, Cow Face Pose and the Pigeon variations.

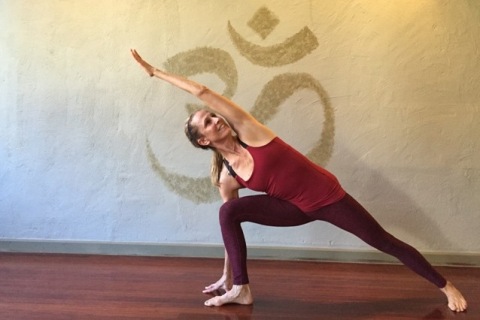
Back Bends are energizing and opening.  Do these in the morning and not at night as even restorative Back Bends can energize you.

Twists are great poses.  They often relieve minor low back discomfort.  But their best attribute is that they change energy.  Twists can release excess energy and calm you down, or they can get the blood flowing and stimulate you.  So, if you are ever unsure of where to start, try a couple of twists and see where that takes you.

Seated Poses are calming and quieting.  They can also help ground you as you are physically closer to the ground than even in standing poses.  They also help get you ready to be more passive and still.  Vertical poses are more stimulating and the closer you get to horizontal, the less stimulating poses can be.  (except in  low back bends like Cobra.  Contracting the spinal muscles against gravity takes an enormous amount of effort and will.)

Forward Bends are introspective and quieting postures.  These are best done at night to get ready for bed.

Restorative Poses can help calm you down.  Travelling can be invigorating and exciting, but often it stimulates our adrenaline.  We need to lower our adrenaline levels to help get to sleep.  This category of poses can help you do that.  And you don’t need to carry a whole host of yoga props with you.  Our hotel room will often have extra blankets, pillows or chair cushions that you can use to prop yourself up pretty comfortable.

Pranayama also can help you get energized or relaxed.  In general, focusing on the inhalation is stimulating and energizing; focusing on the exhalation is more calming and quieting.  Most people are familiar with alternate nostril breath as in Nadi Shodhana Pranayama.  Breathing in this way is very balancing to the nervous system.  However, there are two similar forms of digital pranayama (This is where you use your fingers, or digits, to open and close the nostrils.  In Surya Bhedna Pranayama, you place your hand in front of your nose, as you do in Nadi Shodhana, but you only inhale through the right nostril, while closing off the left and exhale through the left nostril, while closing off the right.  YOu can repeat this for a half a dozen rounds or whatever seems appropriate and comfortable to you.  Surya is the sun channel and like the sun it signifies daytime and activity.  In Chandra Bhedna Pranayama, you use your hand again, as you do in Nadi Shodhana, but this time you close off the right as you inhale through the left.  Then you close off the left and exhale through the right.  Repeat for a few rounds.  Chandra is the moon channel and like the moon it signifies darkness, quiet, night time and sleep.

Now that you know the energy of the postures, you can make up your own routines that help you adjust to the time zone you are in.  Or, just help you feel more present and calm even if you are not changing time zones while traveling.

Poses that are energizing

Use these poses to get you going in the morning even when your native time zone is telling you it’s time to sleep.  You can also use these poses to recharge when you are experiencing that mid-afternoon slump.

Sun Salutes
Standing Poses
Standing Balancing Poses
Handstand
Arm Balances
Back Bends – particularly Bow and Wheel
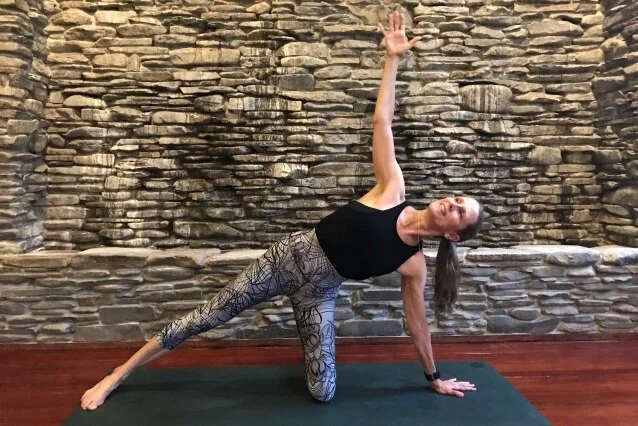
Twists – particularly standing twists
Pranayama – focus on the inhale 

Poses that are quieting

Travel takes you out of your normal routine.  This makes your more alert and outwardly focused. These poses will help you turn more inward and quiet your nervous system.

Seated Poses
Forward Bends
Inversions – such as Head Stand, Shoulder Stand and Legs-up-the-Wall
Twists – particularly seated or supine twists
Restorative Poses – although sometimes restorative poses allow you to catch your second wind
Pranayama – focus on the exhale

Hip opening and low back postures

Lying Hand to Big Toe Pose – straight up, out to the side and twist
Quad stretches
Back Bends – especially Cobra, Bridge and Camel
Twists – Any: standing, seated or supine
Pigeon – and any of its variations
Seated Poses – Cobbler, Seated Wide Legs, Revolved Seated Tree
Pranayama – equal inhalation and exhalation

A note about props

I always take my yoga stuff with me when I travel. I have a thin travel mat that does not take up too much room in my suitcase.  It is not very cush, but sometimes I can place it over a rug, or use a towel to pad my knees, or whatever.  I also travel with two thin (3″) blocks and a 6′ yoga strap.  Anything else I need, I usually try to be creative with what I have in my hotel or Air BnB.   I did take my Awesome Toes with me on this trip.  They feel really good after walking around all day!